From our classic Nintendo memories, Pixel Art is coming back vigorously as new Indie Games are being developed. When done correctly, the outcome is elegant and nostalgic. However, poor knowledge on this matter may result in a catastrophic mess. This is why I strongly encourage you, if you are trying to make Pixel Art for the first time, to take your time and read this small tutorial. It’s quite short, simple, but extremely important. Without these fundamentals of Pixel Art, your work is most likely to become a pain in the ass. Seriously. Without further adue, let’s get to it!

SETTING UP YOUR PHOTOSHOP
It’s quite simple, there is not much to be done here:
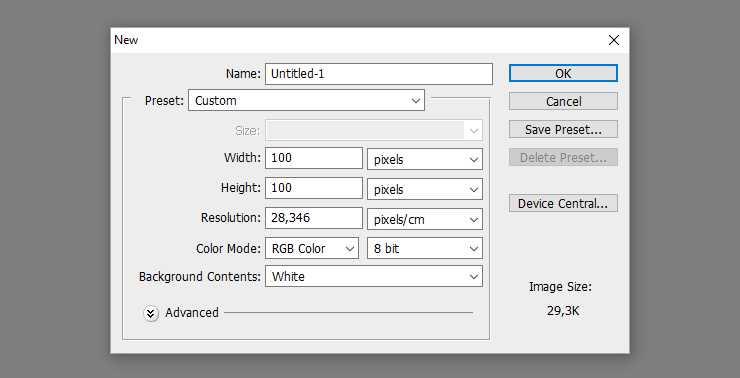
Pixel Arts’ resolutions are quite tiny compared to nowadays images. You will definitely realise how small it is when you save your file, but don’t worry, we’ll fix that later. Create a 100×100 pixels image. You really won’t need it any bigger by now, because it’s not about the size, but how you use it.

Now, instead of using a brush, use a pencil. The pencil creates hard-edge-lines, which is exactly what we need for this. Brushes, however, are designed to create this “fog” when you draw with it. It’s useful in normal-sized drawings for its smoothness, but dreadful in this case.
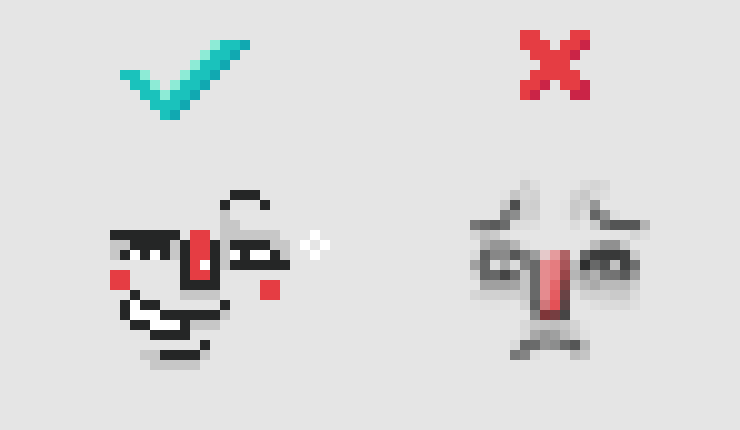
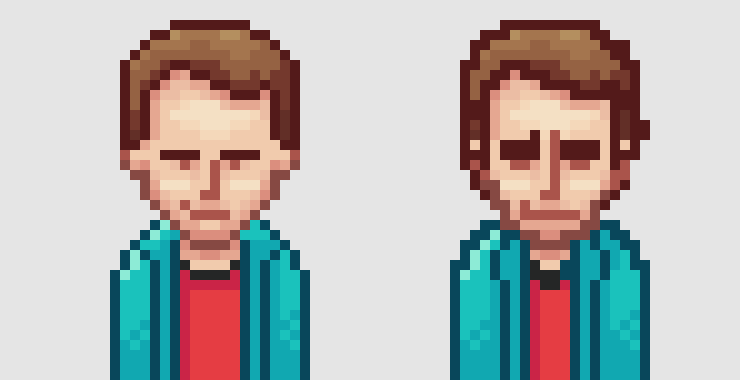
You see the confidence in the left one’s eyes? That’s because he is correct. He was drawn by a pencil. He is cool. The other one? He’s a loser, a nobody. You don’t want to be like him, you want to be like the left one. Don’t use a brush. Use a pencil.
Same idea goes with the eraser. Well, there is no Pencil Eraser tool. Just go to your eraser, and on the top you will see Mode. Select pencil.
Now you’re ready to start drawing! Horaay!
LINE ART
Ok. Most tutorials don’t highlight how much of a critical factor Line Art is, but guys, it’s important. Lines will be the base of every pixel drawing you make, therefore, if you do not plan or lay them out correctly, your drawings will look pretty nasty. However, if you do understand this techinique, your work will turn out to be astonishingly beautiful. See the contrast? You go from Pretty Nasty to Astonishingly Beautiful. I know. This techinique is dirty.
Let’s call it the DIRTY Principle, then. Deadly Important Radical Technique for You. Yep.
Here is how you should do a DIRTY Line Art:
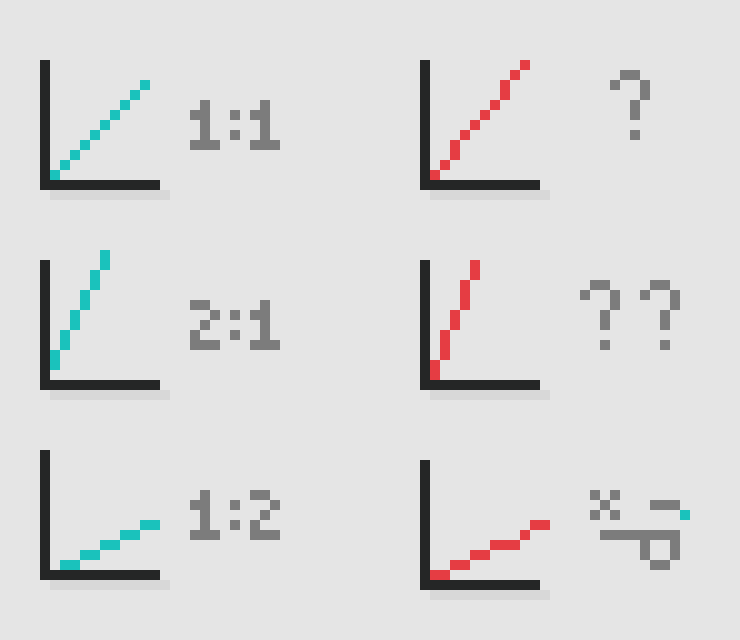
Ratio. The DIRTY Principle is all about ratio. I know, many times it feels VERY tempting to mess with it, because it seems necessary , specially when learning, to alter the lines’ ratios in order to achieve the desired result. You might need a different angle from that of those ratios, and you think you really have to create a line like that. But believe me, although it might feel meaningless on a small scale, when you’re making entire characters and scenarios, these lines stand out… in a very junky way. Your work loses significant quality from these lousy lines and your art will not come to be as “pleasant for the eyes.” Besides, most of the time, if not all the time, you don’t really HAVE to mess with that. I’ll say how in just a minute.
But if I must always keep with the ratio… how am I ever going to create curves? 🙁
— Very Confused Reader
Glad you asked, Very Confused Reader. Getting them pixel curves:

Curves follow the same idea. You just decrease the ratio (the amount of pixels you use) over time. You see, you can play around with the numbers as long as they are in order. To create more subtle curves, the difference between the numbers you use should be bigger. To create smoother curves, the difference should be smaller. They don’t need to end with only One (1) pixel. Play around with these numbers, but always keep it in order. Here are some more examples:
Play around with their positioning. At first you might have some difficulty fitting them in a way that works, but with practice and those principles in mind, you will soon get the hang of it.
KEEP IT CLEAN
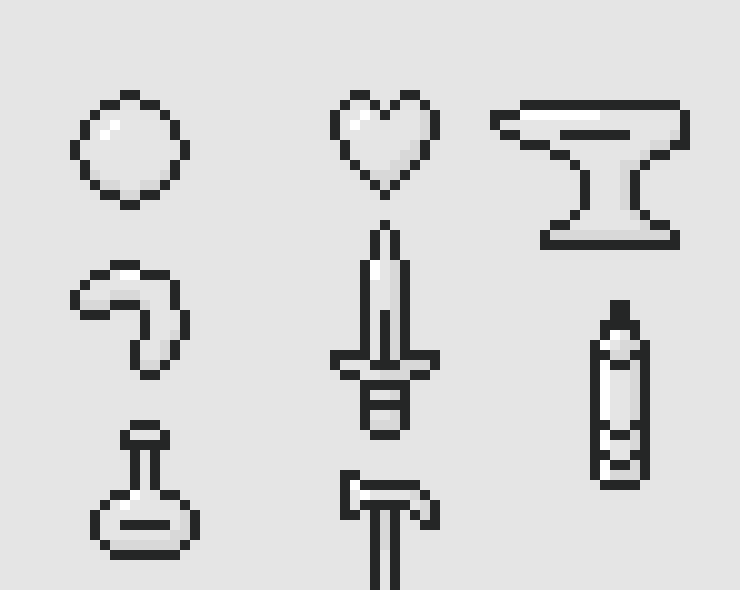
This one is pretty straightfoward. Keep it clean. Don’t stack a lot of pixels together, always try to erase unnecessary ones, otherwise your outcome might seem “poluted.” Here is what I mean:

It creates a much more pleasant result, specially when coloring:
Although many times it is necessary to have a few pixels “together” for the sake of your purpose, always try to get your drawing as clean as they can be.
SAVING YOUR WORK
Alright. You worked your ass off on a drawing. It is looking good. You applied all of your knowledge, time and patience in it. Time to finally save it:
![]()
What the hell?
— Very angry reader
I know. As I mentioned earlier, Pixel art is pretty small. Like… they’re pixels. Therefore, you need to make it bigger.

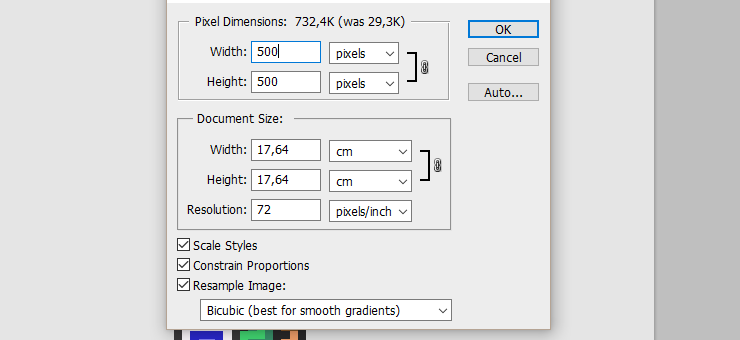
Just go to Image > Image Size. Let’s change from 100×100 to 500×500.
Finally, I’m done.

****
Well, Photoshop used its normal resizing algorithm. But you really don’t want its normal resizing algorithm now. How to proceed?
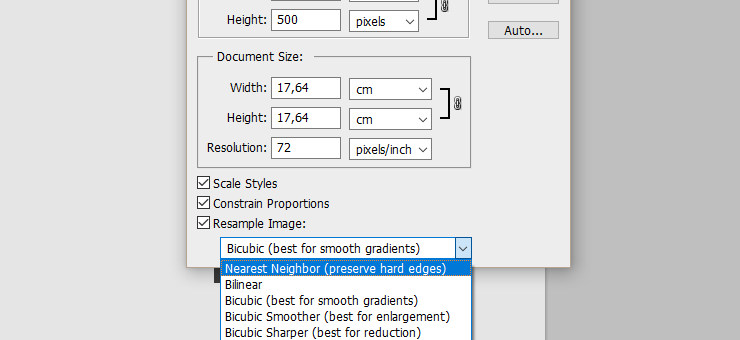
Select the “Nearest Neighbor (preserve hard edges)” option.

And you’re done.
When resizing, you want to consider making it bigger by an integer ratio. If your image was 100×100, get it to be 200×200 (1:2) or 300×300 (1:3) or 400×400 (1:4) and so on. When you do so, Photoshop resizes it Pixel Perfect, without any kind of modification. If you don’t do so, sometimes you may not even see the difference, but Photoshop you add/delete pixels in order to fit the demanded size.
CONCLUSION
That’s about it. You’re now ready to start with Pixel Art. It might feel a bit awkward in the beginning, but with little practice you will realise how easy and fun it can be.
Most importantly, play around with it. These principles are here just to give a bit of a starting direction, but always explore other methods and see what works best for you. You don’t have to religiously follow anything of what I said. Always try new things when making art.
Thanks for your time! Have fun Pixeling!
big fan
Appreciate it, bud!